A short history of Dida Displays. April 2007: I launch the website and blog on my late grandfather Dida's birthday. I'm accepting preorders for the
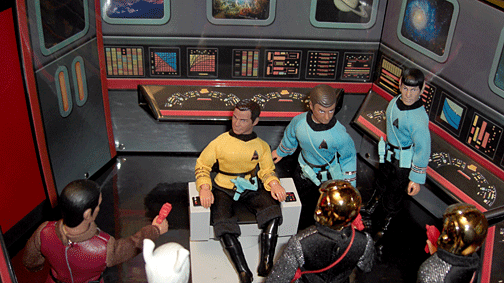
Space Command,
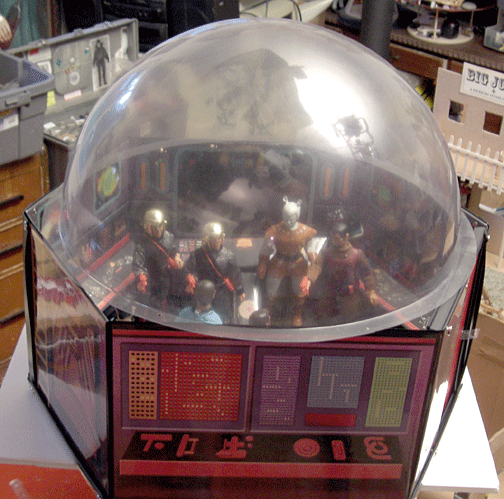
Stately Caverns, and
Mego Museum Displaysets.
Yay!May 2007: My manufacturer in the midwest decides they can't deliver the job. Preorders are refunded and I start looking for a new supplier.
Argh!July 2007: I find a company in LA that can do the job no problem. Very experienced, quality work.I have the tooling shipped from Wisconsin to Los Angeles. Unfortunately, some of the tools are damaged in shipping and will have to be rebuilt.
Argh!September 2007: It's turned out to take a long time to get things done. Phone calls don't get returned, it's hard to get answers. My project is small and not a priority. It doesn't help that I've made this fairly complicated and there's some confusion. But finally the order is placed for Displayboxes in 3 different configurations, consoles, and towers. Art for Space and Caverns has been shipped down for sealing. I've made the order smaller than originally planned because I'm not sure what the prospects will be for this and the cost turns out to be almost the same.
October 2007: I start taking preorders again. Response to the Space Command, Stately Caverns and Mego Museum Displays are still good. I'm feeling confident.
Yay!November 2007: Now I'm worried. It doesn't seem like we are close to delivering and I can't figure out why. They are working on it.... But one thing that IS delivering is my first born son, and soon! Can the displays be delivered , assembled and shipped before he comes?
Argh!November 26 2007: 
Jonah Edward is born.
Yay! But the Displays are not ready and I tell them to get them to me in January when I will be freer to deal with them.
January 31st 2008: Everything is delivered to my storage unit in Oakland. The wait was worth it. The parts are so much better than what Wisconsin made it's ridiculous. They had cut the chipboard to small, so the panels weren't tight and the diplays started to sag and warp after awhile. These are gorgeous.
Yay!Mid-February 2008: Life with baby and a day job is about all I can handle. I advertise for someone top do the assembly of the displaysets for me. Art has be inserted on the outside walls, then hundreds of snaps put in. Consoles have to be riveted together and that's tricky. The sliding doors have to be made and they are more complicated than they look--cut and drill the track, attach to the walls in a special way. I find a smart friendly guy with a shop in his garage who seems very qualified to do the job. He's a Star Trek geek so he speaks our language. It's in good hands, I think we can ship these in March.
Yay!In the meantime the printing outfit I had been using can't deliver affordably anymore and I'm scrambling to find a new source. I need hundreds of color prints.
Argh!Mid-March: There's been some snags as can be expected trying to start a new person on a complicated project. I find it hard to explain things fully and a few things get done wrong and have to be fixed. Then my helper gets the flu for 10 days. Of course. I'm set to go on vacation for a week in Hawaii and I don't want to be sitting on the beach worrying about these displays. "No problem," he says, "We'll get em done, I've got my system down."
Meantime, my friend Anthony
(The Toyroom) offers to help me with my printing troubles. Plus, he's doing some designs to use in Dida Displays!
Yay!March 26 2008: It's clear it's not getting done before vacation. Okay, fine. Have them ready by the time I get back and we're good. The night before I leave he calls me and tells me his knife slipped while cutting board to make Batpole boxes and he cut himself pretty bad. He won't be able to do much for a couple of weeks but he's going to hire a local kid to help him. Have a nice trip.
Argh!April 5th, 2008: After a nice vacation with the wife and baby (10 days with them! What a treat!
Yay!) I'm back and ready to get this DONE.
Well, it turns out he lost the lease on his shop and has to move out. I'm not surprised anymore. No
Argh! , just load up the truck and move on.....
So I'm back to square one. After almost 2 months he's got snaps in exactly half of the Space Commands. Even with a crying baby and a day job I'm certain I could have done 4 times as much myself. Without question.
And that's what I want to do. I'll get a friend to help me here and there, break it up into manageable chunks and get these things done. I'm dying to fill the orders for my very patient and supportive customers and then get on to designing new playsets. Follow my progress here on the blog as I try to finally fullfill these orders and stay tuned for some really cool new stuff!
Yay!


